It pours. I've been a bit off-kilter the past few weeks. Seems like everything goes at once. My body, the microwave, the printer/scanner. At least I can say they've all been fixed. I think.
This morning I did something I shouldn't have and purchased a new four-in-one printer/scanner/copier/fax. I'd done a little research and asked around a bit and finally decided on a Lexmark 9575, mainly because it was on sale for a really, really good price and had more features than the HP I was looking at. But nothing in life, I have learned, is easy. Well, setting up the unit was very easy, but getting it to actually print, well, not so much.
However, after having to damp-clean the brand new black cartridge (after wasting ink on three machine-cleanings and three alignment attempts), the print seems fixed. Now I get to play around a bit with the scanning feature so I can be prepared for tomorrow's Scanfest.
I scanned some images from my collection; three to be exact. It is automatically set to scan at 300 dpi (which can be changed) and once the scan is complete it offers the opportunity for some minor editing, which is good since I want three individual images, not one conglomerate. So I scan the tree images on the same scan and hit "Crop". I crop one of the photos and save.
YAYAY. Well, not quite. I can't find my way back to the scan image to crop the other two images. Not an option to be found. Nor can I find and automatically saved copy of the overall scan. I never needed that on the HP but it was always there. Now I need it with the Lexmark and can't find it! But I haven't given up yet.
I proceeded to rescan the images, this time trying to crop all three images at once. No go. Soon as I click on image number two to crop that one, the field to crop in image number one disappears. So I do what any intelligent woman would do: I open the user's guide and search for "Scan Multiple Images". There is such an option, so I read the instructions and find that on the "Simple Scan" Screen (not the default screen to which the program opens) you can select "Multiple Photos". So I did and repeated the editing process above to crop.
Only I still can't crop more than one of the images at a time and once I crop one I cannot get back to the screen that has all the images to crop the next one. I will have to explore this more after dinner.
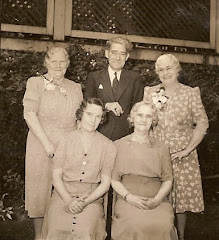
In the meantime, here is a comparison for me and for you (for me as I haven't looked at the two images side-by-side yet either). The photo on the left is the image I have from my old HP scanner. The image on the right is the same image from the new Lexmark scanner.


The bottom image is the same photo scanned on the Lexmark unit with "Sepia" added on the advanced editing screen. The first one, scanned from the HP, is the coloring of the actual photo, and, oddly, was scanned at a dpi of 200 since I didn't know when I originally scanned it that I could change that. The Lexmark scans at a default of 300 dpi. I'm not liking that scanned image off the Lexmark has different coloring than the original.
I haven't played around much with the editing on the second scan, and there are settings available to change the saturation, so maybe that will help. Just seems to me that the image should be scanned and portrayed as is and leave the editing to the person doing the scanning.
Does anyone in Blogville own this unit? Any ideas? I hope to play around with it a lot tomorrow, as I may be able to exchange it if I don't like it.


1 comment:
Hi Colleen,
Congratulations! I've awarded you with the One Lovely Blog Award.
Kathryn
Post a Comment